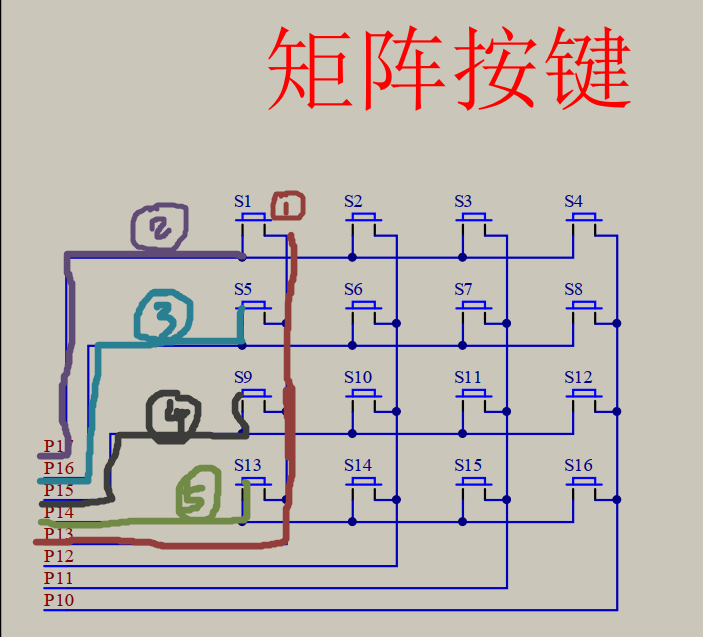
6-1矩阵键盘
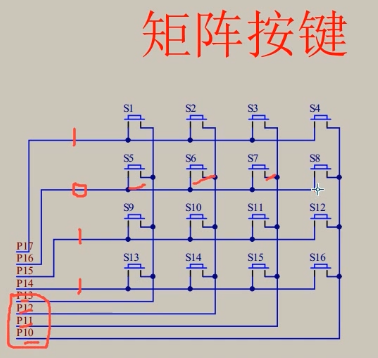
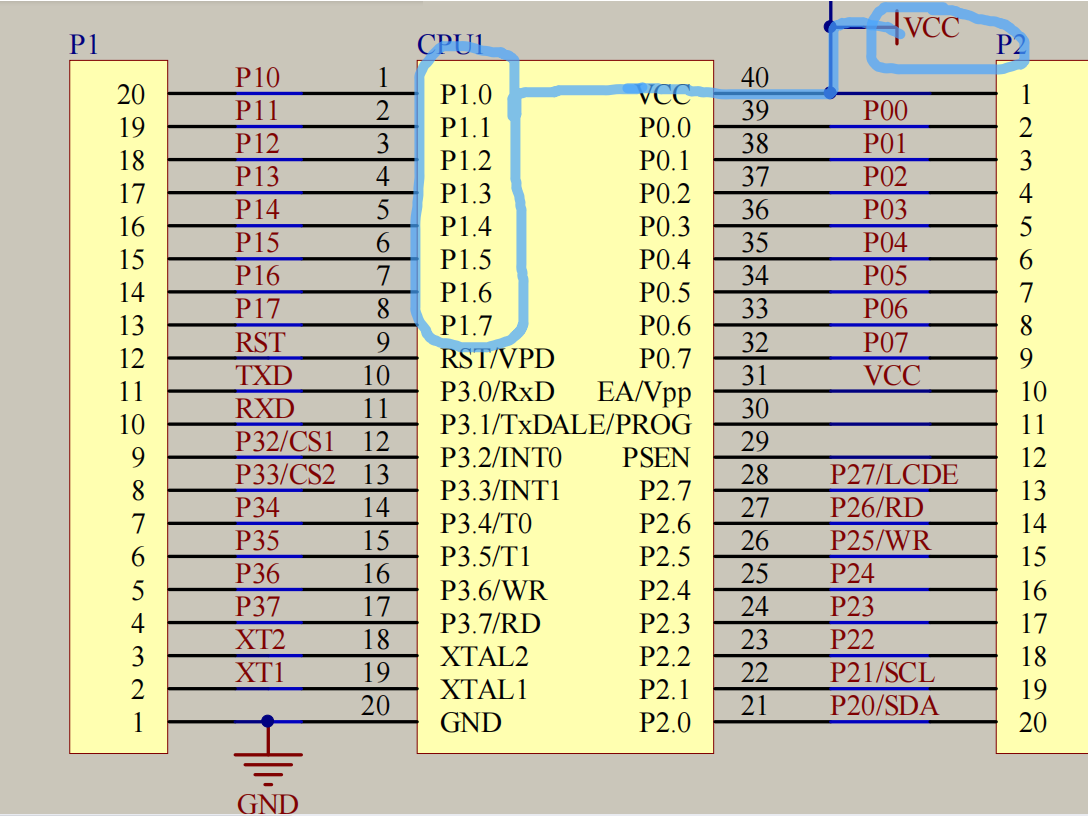
前四根线(P17~P14)判断行,给0相当于接地(由上面这幅图我们知道P1的一端已经接在了VCC,所以要让P1_x运行,要给它低电平,即0),此时io口为低电平
后四根(P13~P10)判断该行对应的某一个按键
下面的代码主要是实现控制矩阵键盘,并把按下去的键位对应的数字在LCD1602上显示出来
ps:常见的Delay就不放出来了,懂得都懂
matrix矩阵
MatrixKey.h
#ifndef __MATRIXKEY_H__
#define __MATRIXKEY_H__

unsigned char MatrixKey();

#endif
MatrixKey.c
#include <REGX52.H>
#include "Delay.h"

unsigned char MatrixKey()
{
	unsigned char KeyNumber=0;

	P1=0xFF;//有点相当于初始化
	P1_3=0;
	if(P1_7==0){(Delay(20));while(P1_7==0);Delay(20);KeyNumber=1;}
	if(P1_6==0){(Delay(20));while(P1_6==0);Delay(20);KeyNumber=5;}
	if(P1_5==0){(Delay(20));while(P1_5==0);Delay(20);KeyNumber=9;}
	if(P1_4==0){(Delay(20));while(P1_4==0);Delay(20);KeyNumber=13;}

	P1=0xFF;
	P1_2=0;
	if(P1_7==0){(Delay(20));while(P1_7==0);Delay(20);KeyNumber=2;}
	if(P1_6==0){(Delay(20));while(P1_6==0);Delay(20);KeyNumber=6;}
	if(P1_5==0){(Delay(20));while(P1_5==0);Delay(20);KeyNumber=10;}
	if(P1_4==0){(Delay(20));while(P1_4==0);Delay(20);KeyNumber=14;}

	P1=0xFF;
	P1_1=0;
	if(P1_7==0){(Delay(20));while(P1_7==0);Delay(20);KeyNumber=3;}
	if(P1_6==0){(Delay(20));while(P1_6==0);Delay(20);KeyNumber=7;}
	if(P1_5==0){(Delay(20));while(P1_5==0);Delay(20);KeyNumber=11;}
	if(P1_4==0){(Delay(20));while(P1_4==0);Delay(20);KeyNumber=15;}

	P1=0xFF;
	P1_0=0;
	if(P1_7==0){(Delay(20));while(P1_7==0);Delay(20);KeyNumber=4;}
	if(P1_6==0){(Delay(20));while(P1_6==0);Delay(20);KeyNumber=8;}
	if(P1_5==0){(Delay(20));while(P1_5==0);Delay(20);KeyNumber=12;}
	if(P1_4==0){(Delay(20));while(P1_4==0);Delay(20);KeyNumber=16;}

	return KeyNumber;
}
我们可以发现这个函数代码是由四组模板一样的小代码组成的,下面将拎一组出来解释
P1=0xFF;//让所有的P1口都为1,就是不对他们进行操作,让他们处于standby状态P1_3=0;//"唤醒"列,我们先控制P1_3,让他为0,处于运行状态--①//然后逐个判断用户按下了哪个键位+按键消抖,检测松手,赋相应的值给KeyNumber
if(P1_7==0){(Delay(20));while(P1_7==0);Delay(20);KeyNumber=1;}//--②
if(P1_6==0){(Delay(20));while(P1_6==0);Delay(20);KeyNumber=5;}//--③
if(P1_5==0){(Delay(20));while(P1_5==0);Delay(20);KeyNumber=9;}//--④
if(P1_4==0){(Delay(20));while(P1_4==0);Delay(20);KeyNumber=13;}//--⑤main.c
#include <REGX52.H>
#include "Delay.h"
#include "LCD1602.h"
#include "MatrixKey.h"

unsigned char KeyNum;

void main()
{
	LCD_Init();                       //初始化
	LCD_ShowString(1,1,"Martix:");    //从第一行第一列开始输入
	while(1)
	{
		KeyNum=MatrixKey();			  //把返回的KeyNumber赋值给KeyNum
		if(KeyNum)
		{
			LCD_ShowNum(2,1,KeyNum,2);//我们要在这句话中才能让灯亮起来,关键在于让KeyNum为0的时候根本读不到这句话
		}
	}
}
对于if的解释 iiiiiiimportant!!!!!!
while(1)
	{
		KeyNum=MatrixKey();			  //把返回的KeyNumber赋值给KeyNum
     	LCD_ShowNum(2,1,KeyNum.2);
} 如果没有if,先进入while(1)循环中,那么当用户按下S1的时候,Matrix函数返回KeyNumber的值给主函数的KeyNum,此时KeyNum为1,LCD1602迅速地显示“1”(很快啊!肉眼根本看不见的那种),随即跳出此次的while(1)循环并进入下一次while(1)循环,因为下一刻用户不可能速速按下某个键位,所以这时候Matrix函数中初始化的那句
unsigned char KeyNumber=0;就会直接被返回到主函数的KeyNum中,即KeyNum为0,所以,我们看到的现象是,无论怎么按都只会显示0,其实有显示过1的,但是太快了,看不见。
那么,我们加了if(KeyNum)后,当默认为0的时候,if判断为假,就不会出现0,因为为0的时候,根本不会进入到LCD_ShowNum中执行,所以一直显示的是按下去的键位的辣个数字。
强迫症+专业注释
/**
  * @brief  简介
  * @param  参数1
  * @param  参数2
  * @param  参数n
  * @retval 返回值
  */
6-2 矩阵键盘密码锁
以下代码是在6-1的基础上修改的,所以不再放出Matrix函数,直接上main.c
ps:注释不会改中文哈哈哈打出来全是”?”,因此以后的注释都是全(塑料/工地)英制
main.c
#include <REGX52.H>
#include "Delay.h"
#include "LCD1602.h"
#include "MatrixKey.h"

//初始定义未赋初值时默认赋值为0
unsigned char KeyNum;
unsigned int Password,Count;

void main()
{
	LCD_Init();
	LCD_ShowString(1,1,"Password:");
	while(1)
	{
		KeyNum=MatrixKey();
		if(KeyNum)
		{
			if(KeyNum<=10)  //if S1~S10keys are pressed ,input password
			{
				if(Count<4) //if the time of inout < 4
				{
					Password*=10;//password RL
					Password+=KeyNum%10;//consider the situation of when user press s10 then output 0 ,and get one password
					Count++;  //metering +1
				}
				LCD_ShowNum(2,1,Password,6); //when finishe the enter,updata the display
			}
			if(KeyNum==11)//if press S11--->confirm
			{
				if(Password==2345)  //if the password == the correct password
				{
					LCD_ShowString(1,14,"OK");
					Password=0;//the password zero clearing
					Count=0;   //metering zero clearing
					LCD_ShowNum(2,1,Password,6); //updata the display0
				}
				else
				{
					LCD_ShowSrting(1,14,"ERR");
					Password=0;//the password zero clearing
					Count=0;   //metering zero clearing
					LCD_ShowNum(2,1,Password,6); //updata the display
				}
			}
			if(KeyNum=12)//if press S12---> cancel
			{
				Password=0;//the password zero clearing
				Count=0;   //metering zero clearing
				LCD_ShowNum(2,1,Password,6); //updata the display
			}
		}
	}
}我们一节一节地看,以下从用户按下某个键位开始,即从if(KeyNum)开始往下看
输入Password
if(KeyNum<=10)  //if S1~S10keys are pressed ,input password
{
	if(Count<4) //if the time of inout < 4
	{
		Password*=10;//password RL
		Password+=KeyNum%10;//consider the situation of when user press s10 then ouput 0 ,and get one password
		Count++;  //metering +1
	}
	LCD_ShowNum(2,1,Password,6); //updata the display
}这里的设定是,按下S1~S10时,对应1~0,这里用到的很妙的一招是
Password*=10;
Password+=KeyNum%10;Password自×10,则相当于所有数字往左移动一位,待输入的数字由0占据
再输入的数字一定是从个位开始,然后在按下下一个按键时,往左移动,就,很妙啊!
然后再设定只能输入4次,噢对了,我们在一开始设置了全局变量
unsigned int Password,Count;所以Password和Count初始值都是0,因此Count<4即输入四次
确认键
if(KeyNum==11)//if press S11--->confirm
{
	if(Password==2345)  //if the password == the correct password
	{
		LCD_ShowString(1,14,"OK");
		Password=0;//the password zero clearing
		Count=0;   //metering zero clearing
		LCD_ShowNum(2,1,Password,6); //updata the display
	}
	else
	{
		LCD_ShowSrting(1,14,"ERR");
		Password=0;//the password zero clearing
		Count=0;   //metering zero clearing
		LCD_ShowNum(2,1,Password,6); //updata the display
	}
}首先,我们约定了2345是正确密码,当输入了2345时按下S11会出现”OK”
然后,就是输入完毕后一切归零,即让用户再次输入(无论输入正确与否)
Password=0;//the password zero clearing
Count=0;   //metering zero clearing
LCD_ShowNum(2,1,Password,6); //updata the display
先让Password重置为0
然后计数Count也为0
一切都回到最开始的样子,即全局变量初始化的样子
取消键
if(KeyNum=12)//if press S12---> cancel
{
	Password=0;//the password zero clearing
	Count=0;   //metering zero clearing
	LCD_ShowNum(2,1,Password,6); //updata the display
}
有了上面的解释,这个应该不难理解吧
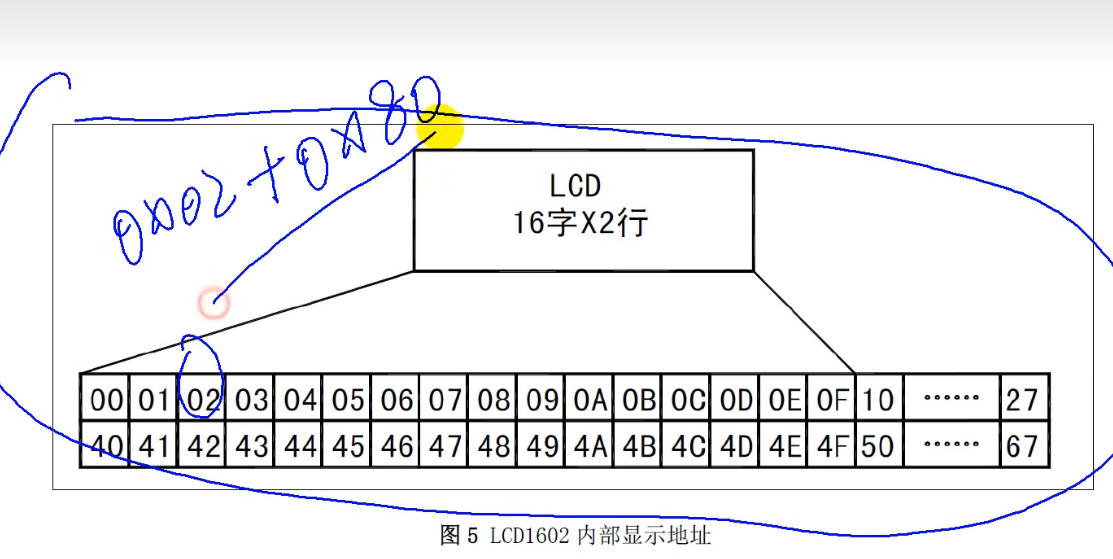
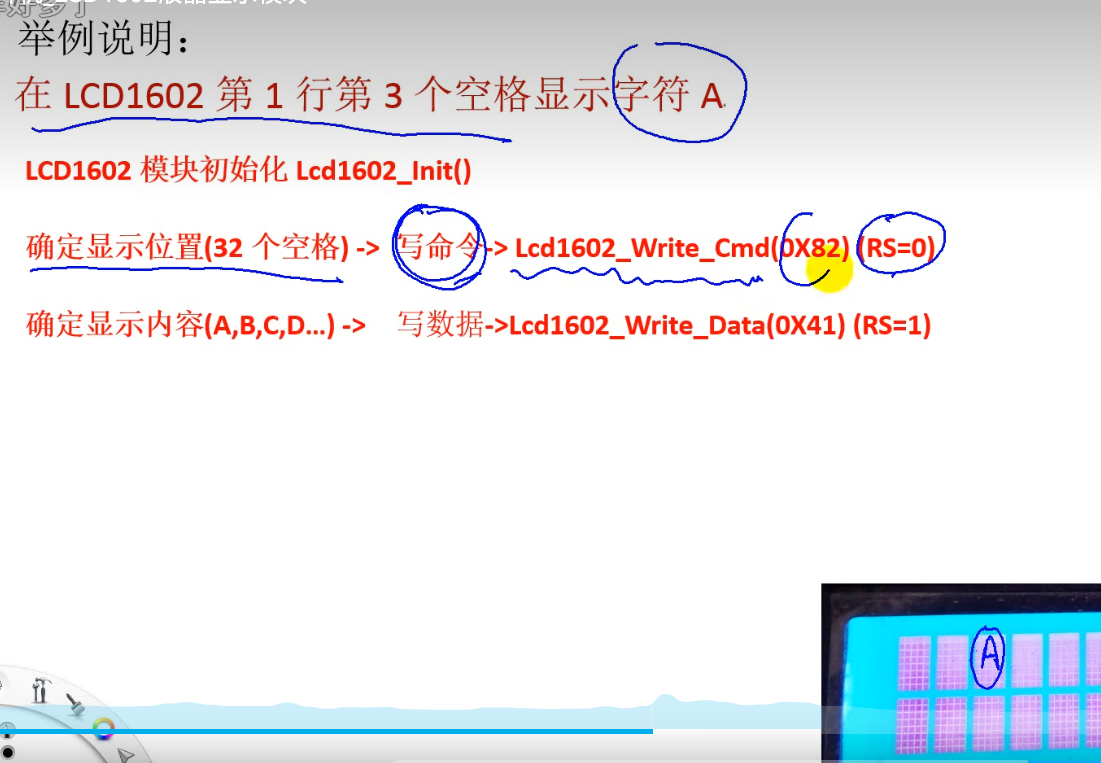
关于LCD1602.c